


How to build an ice rink at home step by step
There’s nothing like skating at home with family and friends! Especially in Quebec, where winter lasts a long time and winter activities are part of our culture.
In this article, our custom tarps and covers manufacturers will guide you step-by-step through the process of building your own skating rink in the comfort of your own backyard.
Preparing the rink location
First and foremost, choose an area that is flat (as flat as possible) and large enough to accommodate your rink. Clear away any snow, rocks, pebbles, ice (yes!), etc. to create a fairly even surface.
Rink boards: building the contour
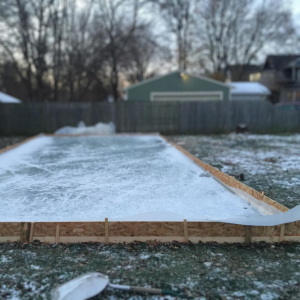
The aim is to form a low wall to contain the water. So, you can use wooden planks, PVC pipes, hay bales, etc. In short, the key is to form a barrier that can hold water – a bit like a swimming pool.
If the area isn’t level, you still need to make sure the barrier is. This means adjusting it to be higher or lower as needed.
Choosing a rink liner
It’s very important to select a quality rink liner based on the dimensions of your rink.
We recommend adding some extra when you measure the rink dimensions, to be sure the tarp is big enough to fit over the edges.
Finding a quality rink liner can help you avoid a variety of complications. Toiles GR offers a wide selection of ice rink tarps, and we can even custom-make one for you. A top-quality tarp can last for several years, unlike less sturdy varieties.
Protective tarps and nets available now!
Installing your tarp
Install the tarp so that it completely covers your rink’s surface.
Make sure the edges extend past the rink to form a pool shape.
Stretch the tarp tightly and secure it around the perimeter of your rink’s structure. This will prevent it from shifting when you add water. Make sure there are no holes in the liner before you proceed to the next step!
Filling your rink
Fill your rink with water on a day when it’s not too cold (0°C and above).
Start with a few inches of water, so you can still make adjustments if your rink isn’t level. One good way to tell is to notice whether one side fills up faster than the other. Once it’s even, let the water run until the rink is a few inches full.
The ice should be at least 3″ thick to prevent cracking.

A test of patience
Now that your rink is filled with water, all that’s left is to wait for it to freeze. This usually takes about a month. Of course, if you’re skilled at predicting the weather, you might be able to time it a bit better.
The most important thing is to install everything before the freeze-up period. Then, you just need to wait until it’s cold enough for the water to turn to ice.
And that’s it! Time to get out your skates.

Maintenance
To prevent your skating project from failing after all that work, remember to add a little water to the rink throughout the winter.
Creating a smooth rink surface
For a smoother surface, spray the rink with a thin layer of water until the entire area is covered. Then, use a homemade rink resurfacer (mini-Zamboni).
Tip: use a thin layer of hot water to melt imperfections and enjoy a super-smooth surface!
Protecting your rink
It’s a good idea to protect your rink from the elements by covering it with another tarp when it’s not in use.
By following these simple steps, you’ll soon be able to enjoy your own home skating rink. Get out the skates and enjoy winter with your loved ones! It’s the perfect time to create unforgettable memories.